Showing posts with label Bread. Show all posts

Wednesday, 19 November 2014

Bagels

I don't live near anywhere that sells a decent bagel, so if I want one without having to make a long trip, I make them myself. By decent, I mean chewy and slightly sweet, not the dry bread rolls with a hole in which is all I have ever been able to get from a supermarket. 

Bagels aren't hard to make, if  you have an electric mixer with a dough hook. You could make them by hand, but it would be a real upper body work out to knead the dough- it's so dry and dense it takes at least 10 minutes using a machine to knead the dough to the requisite smooth texture. Perhaps if you are stuck doing it by hand, get a friend to take turns with. 

The recipe I use (Nigella's) gives the dough a one hour rise at room temperature, I often let the dough rise overnight in the fridge instead. This way, if you want bagels for brunch, you can make up the dough the night before, and just have to do the shaping, poaching and baking the next day. I have made it both ways- the one hour rise, and the slow rise in the fridge- and haven't noticed any difference in the results. 

For shaping the bagels, I find it easiest to get a ball of dough, make a hole in it with my index finger, and gently widen it. The suggested method- having a strip of dough, curling it round into a circle and sealing the edges doesn't really work for me- my seals usually break, and I end up with 'C' shaped bagels. Another blogger suggested using a small round cookie cutter to cut out a hole, which I think is a great idea, and I would have tried it if I had the right sized cutter.


1 kg of white flour, plus more as necessary for kneading 1 tablespoon of salt
7g of easy yeast or 15g of fresh yeast
2 tablespoons of sugar
1 tablespoon vegetable oil, plus more for greasing
500mL warm water, plus more as needed
2 tablespoon of malt extract or sugar, for poaching the bagels (I got malt extract at Holland and Barrets)
2-3 baking sheets, oiled or greased

Combine the flour, salt and yeast together in a large bowl, add the sugar and the oil to the water. Make a well in the dry ingredients and add the liquid, mixing to a dough with a spatula or wooden spoon. Knead the dough either by hand or with dough hook, trying to add more flour if you can, dough is better drier than wetter, the dough will be stiff and hard work, even with the dough hook it takes 10 minutes. Form the dough into a ball and put it into an oiled bowl, turning once to coat all around, then cover the bowl with clingfilm and leave it to rise for 1 hour. It should be well risen, and when you poke it with your finger , the impression should remain.

 Punch the dough down and then give a good knead and divide into 3 pieces. Using your hands, roll each piece into a rope then cut each rope into 5 pieces. Roll each piece between the palms of your hands into a ball and then roll into another rope, curling to form a ring. Seal the ends by overlapping (or use my suggested method, above)


Put on a large pan of water to boil, when it boils add the malt or the sugar.Sit the bagels on the baking sheets cover with tea towels and leave for 20 minutes by which times they should be puffy. Preheat oven to 240C.

When the waters boiling, start poaching, drop a couple of bagels at a time into the boiling water and boil for 1 minute turning them once, use a couple of spatulas for this. As you poach them put them back onto the oiled baking sheets, well spaced and then bake for 10-15 minutes until they're shiny and golden brown.


Friday, 18 April 2014

Hot Cross Buns

I made these using the same recipe last easter, and left it too late to post a recipe- hot cross buns in June just aren't right. I didn't want to make my own hot cross buns before Easter, but I hope posting the recipe on Good Friday gives any potential HCB bakers the chance to make them over the long weekend.


Again, I turn to Felicity Cloake's 'How to Cook the Perfect...' series. It does make me so much lazier at experimenting with cooking, on the other hand it allows me to bypass mistakes and go straight to perfect recipes- I am torn between whether I love it, or whether I resent having the exploration already done for me. I do know I really enjoy the articles, and I am hugely envious of her job.

I was glad Felicity has written a HCB recipe- before I relied on Felicity, I relied on Nigella; and I wasn't too impressed with her hot cross buns recipe- they were not sweet enough, and were too much like plain bread rolls. Felicity's feel more of a treat, richer and sweeter.

I did still make some adjustments to the recipe:
  • I soaked the currants in Lady Grey tea. Dan Lepard soaks the fruit in his recipe in tea- a touch which creates, in Felicity's words an 'unnervingly juicy result'. I took this as a good thing, although Felicity doesn't do this in her final recipe. Perfection is, of course, subjective. I chose Lady Grey for it's citrussy flavours, which I really like in my Easter bun.
  • I left out the 50g mixed peel, and made up the weight with extra currants. (I hate mixed peel).
  • I added a strip of lemon peel and a strip of orange peel to the milk when I was infusing it with the spices.
  • A controversial choice- I used strips of marzipan to make the crosses. I didn't like the alternatives for making the crosses that Felicity came across- icing, and cream cheese frosting. They both seem an very unwelcome addition. But marzipan doesn't seem unfitting here- and it makes the cross part actually interesting to eat. Also, you can make cut out strips of marzipan that make very neat crosses, whereas piping out a flour and water paste can be a very messy affair.
Soaking raisins in tea and infusing milk with citrus zest and spices.

Dough after the first prove

Shaped and unbaked buns

Unbaked buns with marzipan crosses

Wednesday, 7 August 2013

Anpan


I managed to limit myself to only the one impulse purchase on my last trip to K L Oriental, one of my favourite shops to explore in Leamington- a pack of sweet red bean paste. I have seen several recipes from blogs using this, which intrigued me, but had nothing definite in mind.
I was tempted to try out another recipe from Sunflower's Food Galore, but seeing as I have written about so many of her recipes I wanted to try something new.
I came across anpan on my trawls across food blogs. I had never tried them before, but my housemate had, and gave them a good review. After looking at various recipes for them, I came across on that looked particularly nice from the blog Our Adventures in Japan. Other than the long kneading time, this recipe is very easy- it's worth doing on a lazy weekend. I may try making the dough and letting it rise overnight, and then have anpan for a special breakfast.


A few things about the recipe:
  • The kneading time is long, but it is worth it- it really benefits the texture.
  • Folding in the butter makes the dough unpleasantly greasy to handle, but persevere, it turns smooth and elastic after the second knead.
  • I am usually put of by recipes that list half an egg as an ingredient, but you can use the other half to glaze the buns before they go in the oven.


Wednesday, 17 October 2012

Cherry Tomato Foccacia

This flatbread makes a lovely summery lunch with some feta or goats cheese, and maybe some salad alongside. Like many breads, it takes a while to make, but the level of actual labour is low. Focaccia recipes aren't a new thing to this blog, so I don't post every variation I made. But I felt this was sufficiently different and delicious to merit a blog post of its own.


Ingredients
For the dough:
500g strong white flour
1 sachets dried yeast
2 tsp fine salt
280ml lukewarm water
50ml extra virgin olive oil


For the topping:
250g cherry tomatoes
1 clove garlic, peeled and finely sliced
 Leaves from 10 stalks of thyme, chopped
100ml olive oil
Coarse sea salt, to sprinkle

In a large mixing bowl, thoroughly combine 250 grams of the flour, and all the yeast and salt. Quickly whisk together the water and the olive oil, and stir into the dry ingredients so all the flour is mixed in. Add as much extra flour as you need to make a dough that is only slightly sticky. Tip onto a floured surface, and knead for 5-10 minutes, until it is smooth and elastic. Return to the bowl, cover with a tea towel, and leave to rise until it is doubled in size. This should take about 2 hours.

Once the first prove has finished, punch the dough down and give it another quick knead. Line a baking tray with some baking paper and oil. Roll or press the dough into a rough rectangle, about 1 cm thick, and dimple the surface of the dough all over with your fingers. Leave to prove for another half an hour. Meanwhile, half the tomatoes lengthways. In a bowl, combine with the olive oil, garlic and thyme. Leave aside to macerate. Preheat the oven to 200 degrees C.  After the final prove, spread the oily tomatoes over the surface of the bread, and sprinkle lightly with the sea salt. Place in oven and bake for around half an hour, until golden brown.


Wednesday, 16 May 2012

Halloumi and Spicy Sausage Flatbread

Easier to make then pizza and just as tasty. Good for something to nibble on while watching a film or with drinks. Next day leftovers reheat well with one minute in the microwave.


Makes 2 Flatbreads
Ingredients
For the base

500g strong white bread flour
1 tsp salt
1 sachet yeast (3 tsp)
4 tbsp Greek yogurt
2 tbsp olive oil
approx 350ml lukewarm water
 
For the topping
1 egg, beaten with a tsp of yogurt and a tsp cold water
handful of chopped thyme leaves
handful cherry tomatoes, halved
half a packet of halloumi, thinly sliced
150g spicy salami/ sausage/ chorizo, diced

Method
Mix together the flour, salt and yeast. Beat together the yogurt, oil and water- it will separate, but just mix it up to get rid of the lumps of yogurt. Pour into the dry ingredients, and mix to a dough. Knead, adding more flour or water as required to make a smooth, soft dough. Keep kneading until the dough feels elastic. Form into a ball, and cover with a tea towel. Leave for about an hour, until it has doubled in size.

After the first prove, punc. h the dough down to remove the air (very satisfying). Let it sit for 10 minutes. In the meantime, line 2 baking sheets with some baking paper, or flour generously. Preheat the oven to 200COn a floured surface, roll out half the dough in a rough oval shape (my aesthetic preference) about 5mm thick. Transfer this to a prepared baking sheet, and repeat with the second half of the dough. Brush the egg-yogurt mix over both the bread bases, sprinkle over the thyme. Evenly distribute the toppings over the two unbaked flatbreads, then place in the oven and bake for 10-15 minutes until they are golden and puffy.

Friday, 11 May 2012

Nigella's Cornbread


Ingredients
175g cornmeal
125g plain flour 
45 g sugar 
1 fat pinch of salt
 1 tbsp baking powder
 1 egg 
45 g melted butter  
250 ml full fat milk 


Method
Preheat the oven to 200C, grease a square tin, or other suitable receptacle. I used a 20cm cake tin for the cornbread in the picture. Beat the egg into the melted butter along with the milk. Stir in the dry ingredients, just enough to combine. Don't worry if it is a bit lumpy. Scrape into the tin and bake for about 20 minutes, until it is a deeper golden shade and pulling away from the sides slightly.

Wednesday, 18 April 2012

Soda Farls


I've lived in enough student housing to be used to living with horrible kitchens. The worst was perhaps in my third year of university, the constant dampness meant I had to keep flour in my room to stop it from moulding. I still have a limited budget for renting, so I have yet to live in my own place with a kitchen I really loved. Sometimes a grudging fondness, but not loved, or even really liked. The new flat I have moved into has a kitchen with very limited space, an overzealous freezer ( the stalactites are nice to look at, but take up too much room) and a very temperamental oven. A temperamental gas oven, I should add, which means any failed attempts at turning it on fills the kitchen with terrifying, flammable gas. For my first few nights there, I struggled to get the oven to even turn on, which meant I had to do everything stove top until the landlady came round and pointed out the lever you have to pull to ignite it. 

Not having an oven unsettled me. I like baking. I especially like baking in a new house to make it feel like home. There are plenty of things you can make only using the hob, but as soon as I was restricted to it, all I could think about were the things I couldn't cook, primarily bread. At least until I found the solution, and the solution was to make soda farls.

Soda farls use exactly the same dough as ordinary soda bread, but instead baking it, you cook them over a griddle on a low heat until they are cooked through. There is something lovely and old fashioned about cooking bread on a griddle, eaten straight away with butter. For some reason I only ever make them at breakfast time, possibly do to with Ulster fry associations.

To make the soda farls, simply make a quantity of the soda bread dough. Have a flat based griddle or heavy bottomed frying pan on a low heat while you are making it. Form the dough into a ball and cut into quarters. Flatten each piece slightly, to a thickness of about 2-3cm. Sprinkle flour on the bottom of the pan and gently place your uncooked farls on the bottom of the pan. Cook for 20-30 minutes, turning over halfway. They are cooked when they are dark golden on the sides and no longer doughy in the middle. They usually end up with a darker, more cooked surface than soda bread when I make them, because the oven temperature is easier to control in an oven then on a stove. But they are still very good.

Wednesday, 4 April 2012

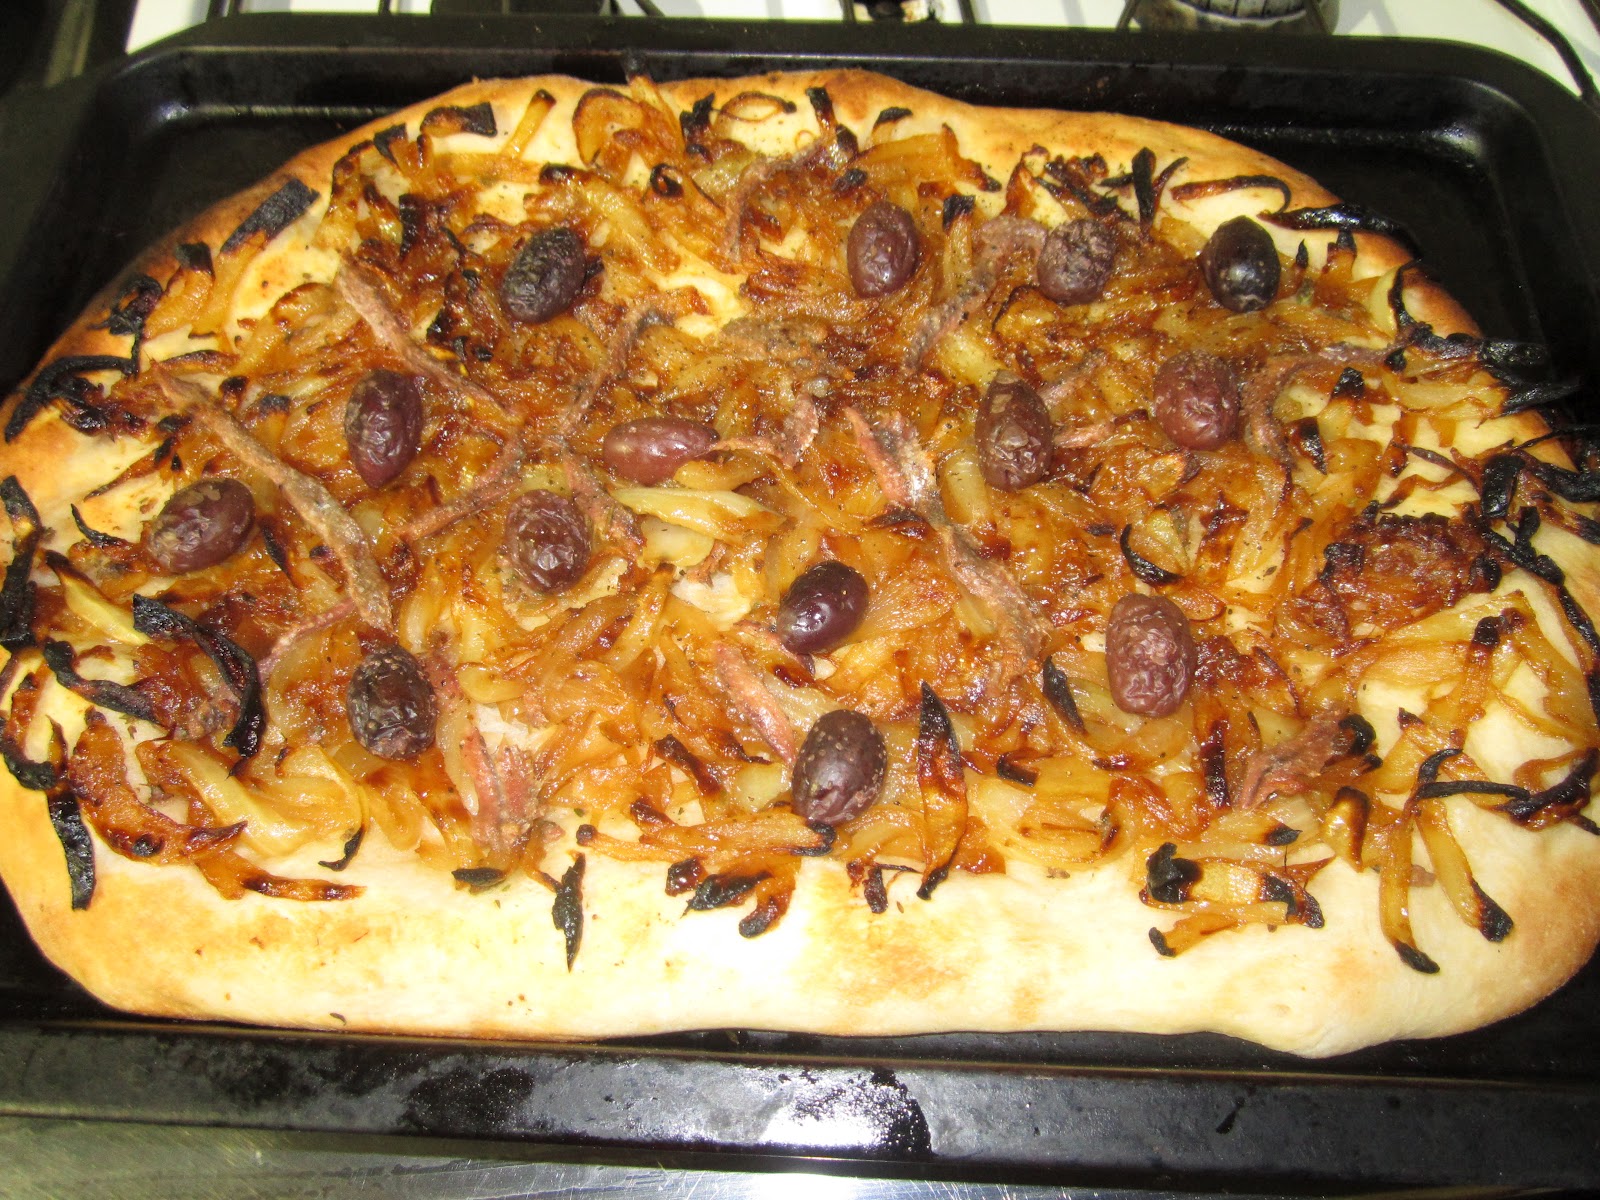
Pissaladière


Pissaladière is niçoise street food, a pizza-like creation topped with caramelised onions, anchovies and black olives. I made it with a bread-dough base which I think is more common, but sometimes shortcrust pastry is used instead. The combination of salty anchovies and sweet onion is incredibly morish, and it's good hot or cold. Although it is tradionally street food, I like making it for a meal at home, maybe with some salad and cheese on the side.

Ingredients
For the dough:
300g bread flour
1 tsp salt
2 tsp dried yeast
4 tbsp olive oil
Lukewarm water
For the topping:
2 tbsp unsalted butter
4 onions, peeled and finely sliced
2 tsp chopped thyme leaves
1 small jar anchovies in oil (you probably won't need it all)
approx 15 black olives, pitted

Method
Start by caramelising the onions. Melt the butter over a low heat, and add the onions. Cook very slowly over the lowest possible heat until golden and melting, almost crushable with a wooden spoon. They should be an oniony mass, not separate slices.
Put the bread flour in a bowl with the salt and yeast. Stir in the olive oil and enough lukewarm water to make a soft dough (about 250ml). Form into a ball, put in a clean bowl and cover with clingfilm. Leave to rise until doubled in size, 1-2 hours.
Preheat the oven to 220 C. Chop 4 of the anchovies with the thyme leaves, very finely. Mix with some of the olive oil to make a spreadable paste. Roll out the dough to a rectangle of about 5mm thickness, and put on an oiled baking sheet. Spread with the anchovy paste. Top with the onions, spreading evenly over the dough. Halve some of the anchovies lengthwise, and make a diamond criss-cross pattern with them on top of the onions. In the centre of the diamonds, place an olive (the decoration is not, of course, essential, you can just dot the olives and anchovies around as you like). Bake for 10-15 minutes. Eat warm or cool.

Tuesday, 28 February 2012

Garlic, Chilli and Parmesan Flatbread

This is a far superior garlic bread than the sort you can buy ready made, with a focaccia base and the added bonuses of chilli and cheese. I do like the 'normal' sort of garlic bread, when it is homemade and a generous hand has spread the garlic-parsley butter between each slice of baguette. It's certainly the best way of transforming the reduced French sticks at supermarket closing time. This version takes a little more time as you are making the dough from scratch, but it hardly takes any more effort, just a little mixing and kneading. The common factor is the butter, and it is important for delectable garlic bread. Although this doesn't quite constitute a meal, it is just the sort of thing that goes down well to eat while watching a film, or just having drinks and conversation with friends.

Ingredients
For the dough:
300g strong white bread flour
1/2 sachet yeast (about 1 1/2 tsp)
tsp salt
300ml warm water
2 tbsp olive oil
To top:
50g unsalted butter, very soft
2 cloves of garlic, very finely chopped or crushed
2 tablespoons Parmesan, grated
pinch chilli flakes
pinch sea salt

Method
Combine the flour, salt and dough in a large mixing bowl. Mix the water and oil in a measuring jug, and pour into the dry ingredients. Mix to make a dough. Knead for 5 minutes, adding more flour if necessary.  It should be a soft elastic dough. Leave to rise until doubled in size, about 2 hours.
Preheat the oven to 200C. Flour a 20cm x 30cm baking sheet. When the dough has risen, punch down it down and knead again, for about a minute. With a rolling pin, your hands, or a combination of both, flatte the dough to a rectangle that fits the baking sheet, it should be about 1/2cm thick. Leave to rise for another 30 minutes. Mean while, mix together the butter, garlic, chilli, Parmesan and salt. When the 30 minutes is up, spread the flavoured butter all over the surface of the dough. Bake for around 25 minutes, until it is golden. Best enjoyed while still hot, or at least warm

Sunday, 5 February 2012

Sweet Focaccia with Peaches and Thyme

My love of the oil enriched bread goes right through the spectrum from savoury to sweet. I've come across many recipes in Italian cookery books for schiacciata con l'uva, a sweetened focaccia with grapes. In Anna del Conte's Book of Italian Food she writes how she and her schoolmates would have a still-warm slice at school lunchtimes, and it is so evocative, I must try making it sometime. But I felt like having a play around with flavours, and came up with this thyme-scented peach focaccia. Thyme might seem an unusual choice here, as it is usually reserved for savoury dishes, but I like the woodsy flavour it gives to the peaches. The earthiness works especially well if you're making this for a picnic. But if the weather is against you for outdoor eating, you'd do well to comfort yourself by having this warm with a scoop of vanilla ice cream  alongside.

You could even make this for breakfast- for the first prove, leave it overnight in the fridge. It will still rise, but the coldness will make the yeast work much more slowly. The following morning, continue as normal. It will require a longer knead, just to make it pliable again. Any overnight guests you have will certainly love you for it.


Ingredients
400g strong white bread flour
1 sachet yeast
50g caster sugar
1 tsp salt
280ml warm water
50ml olive oil
Zest of 1 unwaxed lemon
4 peaches or nectarines
4 sprigs thyme, leaves only, chopped
15g butter

Method
Put the flour, yeast, sugar and salt in a mixing bowl, stir to combine. Pour in the olive oil and water, and mix to a sticky dough. Knead for about 5 minutes. If you need to add extra flour to handle it, do so, but it should be quite a soft mixture. Shape into a ball, and leave it to rise, covered, for about two hours or until doubled in size.
After the first prove, punch the dough down, and knead for another minute. Flour a baking tray. Using a rolling pin or your hands, shape the dough into a rectangle about 1/2cm thick. Place on the tray and dimple the surface all over with your fingertips.  Leave it to rest for another 30 minutes. Meanwhile, preheat the oven to 190 C.  Slice the peaches into eighths. When the proving time is up, top the dough with the fruit, thyme and zest. Cut the butter into tiny cubes, and dot all over the surface. Bake for around 30 minutes. It's best eaten warm, but can be revived in the microwave the following day.

Sunday, 22 January 2012

Thyme and Garlic Focaccia


I like this still warm out of the oven, oily and salty, perhaps dipped into yet more grassily green olive oil. I like it so much I've doubled the quantities of the original recipe to make a gargantuan loaf, so just halve it if you want something smaller. Like most recipes including yeast, it takes a little while, but the actual work involved is minimal. If you want fresh bread in the morning, you can make the dough the night before, let it prove overnight in the fridge and continue with the recipe when you wake up.

Ingredients
1kg strong white flour
2 sachets dried yeast
4 tsp fine salt
560 ml lukewarm water
220ml extra virgin olive oil
4 cloves garlic, peeled.
Leaves from 10 stalks of thyme, chopped
Coarse sea salt, to sprinkle

In a large mixing bowl, thoroughly combine 250 grams of the flour,  and all the yeast and salt. Quickly whisk together the water and half the olive oil, and stir into the dry ingredients so all the flour is mixed in. Add as much extra flour as you need to make a dough that is only slightly sticky. Tip onto a floured surface, and knead for 5-10 minutes, until it is smooth and elastic. Return to the bowl, cover with a tea towel, and leave to rise until it is doubled in size. This should take about 2 hours.

Once the first prove has finished, punch the dough down and give it another quick knead. Line a baking tray with some baking paper and oil. Roll or press the dough into a rough rectangle, about 1 cm thick, and dimple the surface of the dough all over with your fingers. Leave to prove for another half an hour. Preheat the oven to 200 degrees C. Towards the end of the prove, crush the garlic and thyme leaves together into a paste. When you have a cohesive mush, mix in the remaining olive oil. After the final prove, spread the garlic-thyme-oil over the focaccia with your hands. Place in oven and bake for around half an hour, until golden brown.

Saturday, 17 December 2011

Cranberry and Orange Stollen


This is a vulgar and delicious adaptation of Delia's stollen recipe.

Ingredients
150ml Cointreau, Triple Sec or brandy
300ml full fat milk
100grams caster sugar
4tsp dried yeast
700 grams strong white bread flour
220 grams softened unsalted butter
2 eggs, beaten
140 grams dried cranberries
100 grams sultanas
80 grams dried no-soak apricots, chopped
50 grams glace cherries (natural colour, preferably), halved
50 grams almonds, chopped
grated zest of 1 lemon
grated zest of 1 orange
200 grams cranberry sauce
350 grams marzipan
To glaze
100 grams sifted icing sugar
1 tbsp orange juice (from the zested orange used in the dough)

 Method
 Put the dried fruit and glacé cherries in a small saucepan with your chosen alcohol. Bring the liquid to a simmer, then remove from the heat. Now get on with the dough while you allow the fruits to become imbued with festive spirit. Warm the milk  (I do this in the microwave, in  a glass measuring jug), add 2tsp of the caster sugar, and sprinkle of the yeast on the surface of the milk. Leave the yeast to create a frothy head on top of the milk. Now sift the flour into a large mixing bowl with the salt and remaining sugar. Make a well in the centre, and pour in the yeasted milk mixture, along with the eggs and butter. Mix with a wooden spoon, along with the dried fruits, almonds and zest. Knead the dough, either with your hands, or an electric mixer with a dough hook attachment. You may need to add more flour, you want a slightly sticky dough, it is ready when it feels springy and elastic. Put the dough in a bowl, clingfilm and leave to double in size, this could take up to 2 hours.
After the first prove, punch the dough down, and divide into two. Knead one of the halves of dough on a floured surface until it feels springy. Roll out into a rectangle 20cm x 25cm. Spread with half the cranberry sauce. Take half the marzipan and roll into a sausage that is almost the length of the stollen, place in the centre, and fold the dough over it. Remove carefully to a lined baking sheet. Repeat with the other half of the stollen dough. Leave the loaves to rise again, this time about 20 minutes. Set your oven to 180 degrees, and when they have finished the second prove, bake for about 35-40 minutes.
Mix the icing sugar with the orange juice to make a thick icing, and drizzle over the stollens. I also sprinkled over extra cranberries and some pistachios.

Tuesday, 8 November 2011

Simple Soda Bread

You'd be hard pressed to find a soda bread recipe that isn't simple, but this a very basic recipe for it. Less than an hour after mixing together the dry ingredients you have a fresh loaf of bread, which is very satisfying. Whenever I make this, I break one of the cardinal rule of breadmaking and cut into it straight away, so the butter I spread on it melts with minimum persuasion.

Traditionally, you'd use use buttermilk to make soda bread. It's quite readily available in larger supermarkets, however you can substitute it for milk with about a teaspoon of lemon juice. Just squeeze the juice into the milk, stir and leave for about 10 minutes before using.
Ingredients450 grams plain flour
1 tsp fine salt
1 tsp caster sugar
1 tsp bicarbonate of soda
200-300ml buttermilk or milk with lemon juice (see above)

Preheat the oven to 200 degrees centigrade, flour a baking sheet. Sift the dry ingredients together in a large bowl, stir to combine. Stir in the liquid- you may not need the full amount, but keep adding until you have a soft cohesive dough. Pat it gently into a ball- no kneading for this sort of bread- and place on the baking sheet. Make a large cross in the top with a sharp knife, and bake for around 40 minutes until the loaf is golden and sounds hollow when tapped on its underside.